Recently, I started contributing to open source software of the Apache Software Foundation and I developed camel-telegram, a component that allows camel based applications to exchange data using the Telegram messaging network. It has been released as of Apache Camel 2.18.0.
The component is targeted to enterprise applications, to let them route chat messages within their ESB and communicate with users in a novel way. Camel is a widely used integration layer, that forms the basis of production-grade enterprise platforms such as JBoss Fuse. But there exists also a simpler and more ludic way of using it, to create a reactive messaging Bot. I’ll explain how to create such a bot with a 5-mins step by step guide. The full documentation is available in the Camel manual.
Creating the Telegram Bot
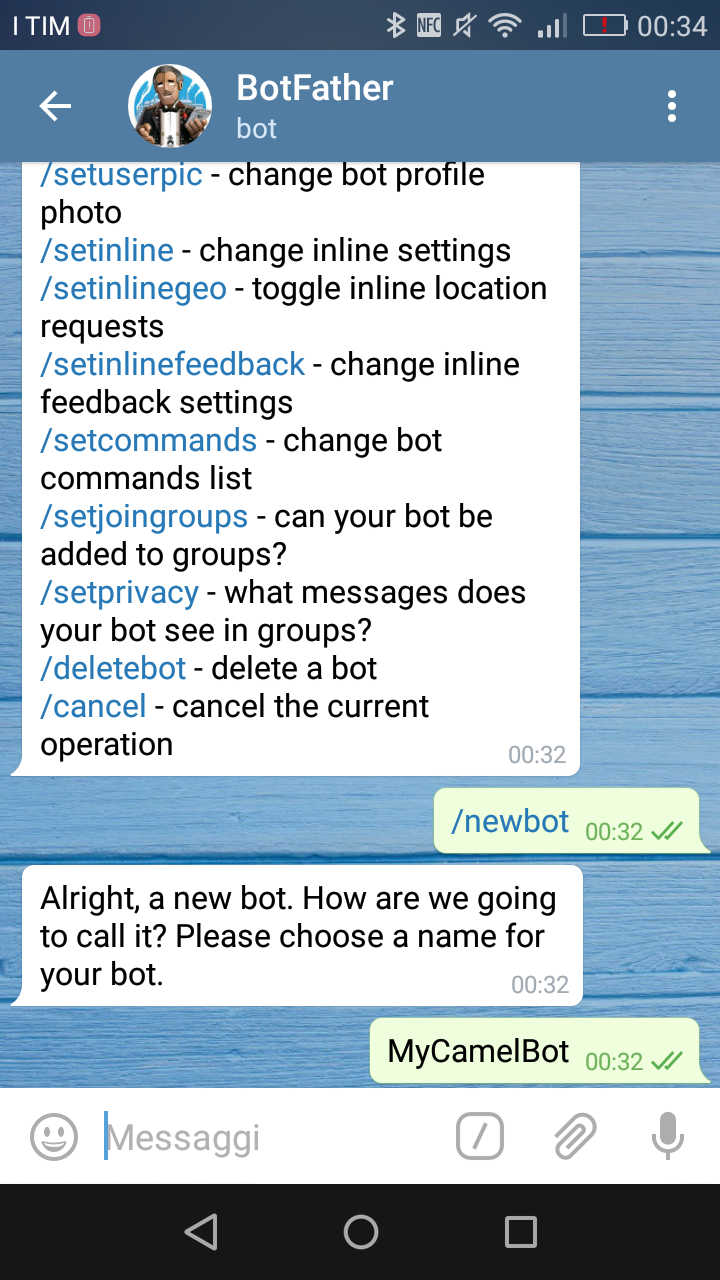
Before getting into the code, you first need to create the bot. Telegram lets you create bots by chatting with the @BotFather, the father of all Bots. The procedure is simple and takes just a minute. Open the Telegram app with your smartphone (it is better using the web version at https://web.telegram.org/, because you’ll have to copy/paste an access token) and start a chat with the @BotFather. So, just press the “write” button and type “@BotFather” (without quotes) as recipient, even if it does not appear at first in your contact list.
Here is what you need to tell the @BotFather:
/newbot
the-bot-name
the-bot-id
Just replace “the-bot-name” with a friendly name for your bot and “the-bot-id” with the unique name (use your fantasy, a lot of names are already taken). Here I attach two screenshots to show the creation of a bot.
 |
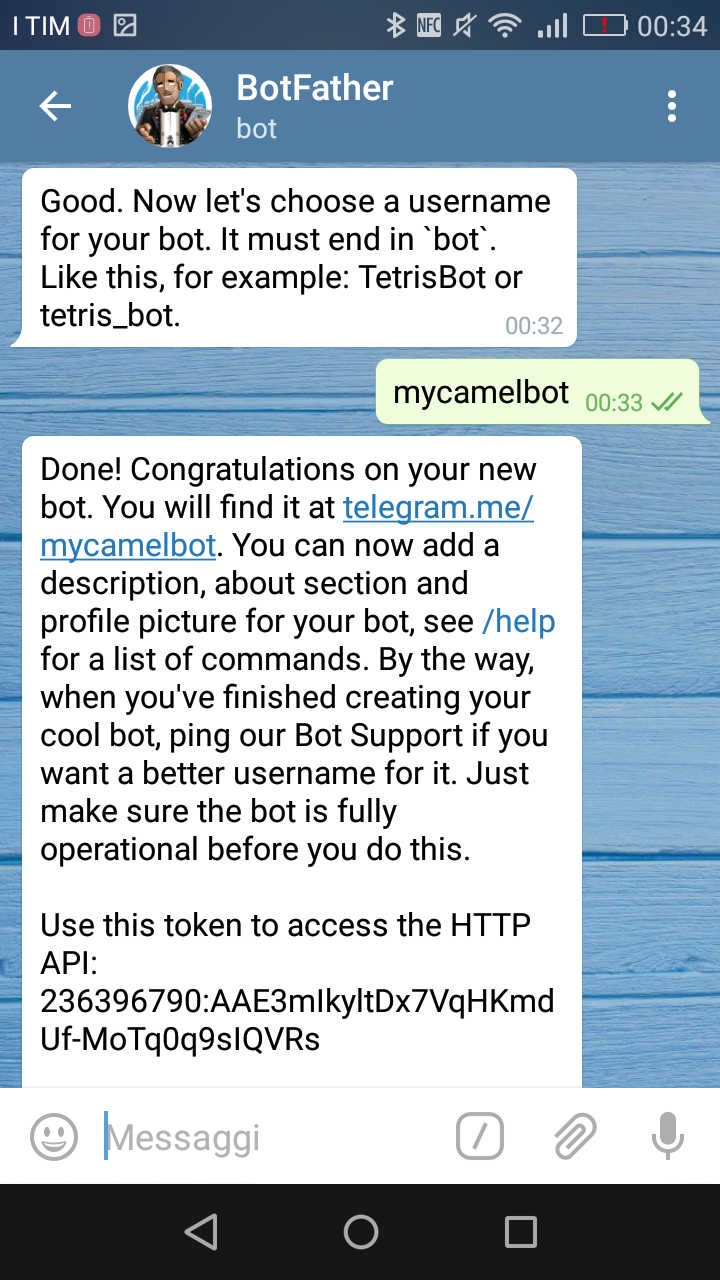 |
You need to annotate the authorization token given by the @BotFather in the last message. It is the key that lets your application act as the Bot (don’t try using the one in the picture, I revoked it :D).
Looking at the Code
Now the programming part. Just clone the skeleton of the bot using the following command:
git clone https://github.com/nicolaferraro/telegram-quickstart.git
Git will create the structure of the quickstart project. You need just to customize 2 files in order to create your own chat bot.
I’m now going to explain all the relevant parts, you can find the full code in the github repo https://github.com/nicolaferraro/telegram-quickstart. First, the Maven pom.xml, that imports the camel-telegram-starter component and all the related libraries.
    <!-- ... -->
    <properties>
        <camel.version>2.18.0</camel.version>
        <spring-boot.version>1.4.1.RELEASE</spring-boot.version>
    </properties>

    <!-- Some dependency management -->
    <dependencyManagement>
        <dependencies>
            <dependency>
                <groupId>org.apache.camel</groupId>
                <artifactId>camel-spring-boot-dependencies</artifactId>
                <version>${camel.version}</version>
                <type>pom</type>
                <scope>import</scope>
            </dependency>
            <dependency>
                <groupId>org.springframework.boot</groupId>
                <artifactId>spring-boot-dependencies</artifactId>
                <version>${spring-boot.version}</version>
                <type>pom</type>
                <scope>import</scope>
            </dependency>
        </dependencies>
    </dependencyManagement>


    <dependencies>

        <!-- Import the camel-telegram dependency -->
        <dependency>
            <groupId>org.apache.camel</groupId>
            <artifactId>camel-telegram-starter</artifactId>
        </dependency>

    </dependencies>
    <!-- ... -->
Second, we define a camel route to describe how messages should flow inside the application. It is defined using the Java syntax in the CamelRoute class.
package com.example;

import org.apache.camel.builder.RouteBuilder;
import org.springframework.beans.factory.annotation.Autowired;
import org.springframework.stereotype.Component;

/**
 * This class is responsible for routing the messages from and to the Telegram chat.
 */
@Component
public class CamelRouter extends RouteBuilder {

    @Autowired
    private Bot bot;

    @Override
    public void configure() throws Exception {

        from("telegram:bots")
        .bean(bot)
        .to("telegram:bots");

    }
}
As you see, all incoming messages are routed to a bean named Bot and the replies generated by the Bot are routed again to the source chat. Note that the Telegram component (starter version) requires that you specify the Telegram authorization token inside the application.properties file.
# To keep the application alive
camel.springboot.main-run-controller=true

# Create a new bot using the BotFather, then put here your token
camel.component.telegram.authorization-token=replace-me-with-your-telegram-token
You must change the file to put your own authorization token, the one given by the @BotFather.
To complete the picture we just need to write down the Bot logic, by implementing one method in the Bot class.
package com.example;

import org.slf4j.Logger;
import org.slf4j.LoggerFactory;
import org.springframework.stereotype.Component;

/**
 * This class contains the chat-bot logic: use your fantasy to implement your own Bot.
 */
@Component
public class Bot {

    private Logger log = LoggerFactory.getLogger(getClass());

    /**
     * This method processes incoming messages and return responses.
     *
     * @param message a message coming from a human user in a chat
     * @return the reply of the bot. Return null if you don't want to answer
     */
    public String process(String message) {
        if (message == null) {
            return null; // skip non-text messages
        }

        log.info("Received message: {}", message);

        return "Why did you say \"" + message.replace("\"", "-") + "\"?";
    }

}
You can leave the current implementation as it is and the Bot will reply to every message with a question (just like a 3-years old baby!!), but I’d better write something else :)
You can change the signature of the method to be able to receive and send also media content (like photo and video) to create a more interesting Bot. Look at the documentation for more info.
Running the Bot
You just need Maven and Java 8 to run the Bot. From the root of the project (where the pom.xml is located), type the following command in a shell to run the application:
mvn spring-boot:run
Maven will download all the dependencies and run your code.
Leave the application running and contact your bot with your smartphone (just write a message to @your-bot-id, using your Telegram app), it will reply to all your messages.
If you want to package the application in a single jar, you can run the following command:
mvn package
It will create a single jar with all the dependent jars nested inside it (note: this is different from a classic uber-jar, it is closer to a .war file). You’ll find the packaged jar into the target directory and you can just run it using:
java -jar target/telegram-quickstart-1.0.0-SNAPSHOT.jar
Have fun!